
Start your car with a button
This tutorial was made for the purpose of making changes that are purely for fun. This tutorial, once completed, leaves the immobilizer active and therefore cannot be followed for the purpose of stealing a car.
Do not try to use this tutorial for illegal purposes, the car will simply not start because you still have to insert the correct key in the ignition to use the buttons.
List of necessary tools:
- 1 "Start Engine" switch
- 1 aviation switch
- Electrician's tape
- Flat screwdriver
- Torx screwdriver (depending on cars)
- Wire stripper
- Cutter
- 2 female terminals
- 3 screw terminals
- 4 Flexible electric wire 0.4mm, 1m long (to be wide)
- Crimping tool
- Drill
- Drill of 12 and 24
1. Remove the steering column cover
Arm yourself with your screwdriver and remove the lower cover of the steering column. The tutorial was made on a Clio 2 phase 2. In this case you have 3 screws to unscrew.

2. Locate the wires connected to the neiman
The wires in question are thicker than the others (0.4mm). They can be surrounded by a black sheath for example to be more discreet. If this is the case, cut the sheath using the cutter to have room to test the wires.
3. Test the wires
There are 4 wires connected to the neiman. Usually on most cars this is a 12V (+) wire, a starter excitation wire, a passenger compartment contact wire and an engine contact wire. With the cutter, make a notch on the wires so as to have the copper exposed.
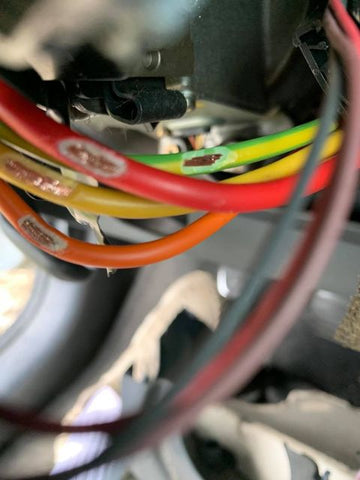
You can then test the wires using a tester or just a screwdriver as long as you have a PLASTIC HANDLE by bringing two wires into contact.
In the case of the Clio, the red is the (+), the orange is the starter, and the yellow is the passenger compartment and engine contact. This means that if the red and orange are switched on AND the ignition is switched on, the car will start.
4. Disconnect your battery
Open your hood and disconnect the (-) battery terminal and isolate the (-) wire to prevent accidents.
5. Strip the wires
Strip the threads half a centimeter from the opening you made in step 3.
6. Reattach the wires

- For the wire (+)
Take one of the 0.4mm wire and strip it on one side for 1cm and crimp a screw terminal on the other. Reattach it to the wire (+), here the red that you have stripped by wrapping it around the copper and twisting it. Then surround the electrician's tape to insulate it.
- For the starter wire
Regarding the starter wire, the procedure will be the same as for the (+) of the previous step except that we will separate the copper into two lugs side: the largest part of the copper will be crimped in a screw terminal, another small part of the copper will be crimped into another screw terminal for powering the LED of the "Start Engine" button.
- For motor contact wires
For the engine contact, you will have to do the same thing as for the starter, namely connect a wire to the (+) 12V wire and a second wire to the engine contact wire, here the yellow one. You will then also have to insulate your assembly with electrician's tape.

8. Connect the wires to the switches
Now that all your wires are connected and insulated on the neiman side, plug the terminals into the switches. For the "Start Engine" switch, there are 3 terminals: 1, 2 and 3 (noted next to the terminal on the switch). The 1 is the (+), the 2 the (-) and the 3 the power supply of the LED.
Connect the (+) wire to terminal 1 of the switch, the larger terminal of the starter wire to 2 and the smaller terminal of this same wire to 3.
For the contact switch, connect the female terminals on the back of the switch. The wire of the (+) on the (+) and the wire of the motor contact on the (-).

9. Test the installation
By turning on the ignition switch, passenger compartment and engine contact must be made.
Then, by pressing the "Start Engine" button the starter should engage and the engine should start. The car key must nevertheless be in the neiman so that the key transponder can be detected by the immobilizer. The engine will not start otherwise.
10. Drill the dashboard
Drill the dashboard where you want the buttons to be.
11. Install the buttons in place of the holes.
Unscrew the rings from each switch and insert the buttons into the holes, then screw the rings back on.
12. Check the connections one last time before reassembling everything
Check that the terminals are well connected / screwed, that all the cables are well insulated with the tape. If all is well, you can reassemble the caches.
13. Reassemble the caches
Step 1 backwards, it's not rocket science!
14. Admire the result
If everything has been done correctly, the ignition switch must turn on the ignition, but also the LED of the "Start Engine" button and the "Start Engine" button must start the engine.

Furthermore, if the key is not in the ignition, the immobilizer will not detect the key, and therefore the "Start Engine" button. will not light up.
IMPORTANT: If your car is equipped with a neiman with steering lock, do not remove the key from the ignition while driving, the steering will lock up at the slightest rotation of the steering wheel and you run the risk of finding yourself in the ditch.
1 comments to
Bonjour pas besoin de mettre un relais?