
Install a dynamic LED strip on the back of your car
List of necessary tools:
- 1 dynamic LED strip
- 2m of electric wire
- 1 Electrician's tape
- 1 soldering iron
- 1 Tin coil
- 1 Cutter
- 1 Voltmeter

1. Remove the rear lights
Unscrew the screws in the trunk at the level of the lights and remove the rear lights. The disassembly method varies depending on your vehicle.
3. Tinning of wires
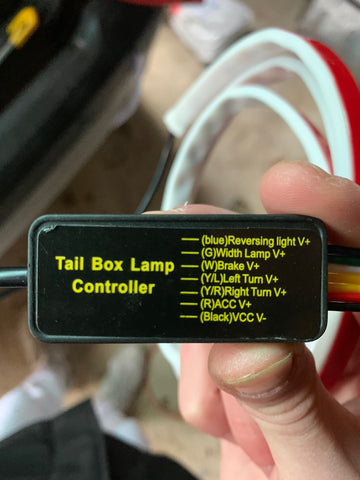
Using your soldering iron, tin the 7 wires of the LED strip. The 7 wires correspond to:
- Red: (+) ACC
- Black: (-) ACC
- Yellow 1: Turn signal on the left
- Yellow 2: Right turn signal
- Blue: Reversing light
- Green: Position light
- White: Brake light
To tin the wires, melt some tin on the iron and place the molten tin on the copper end of the wire.
4. Test the wires of fire
Cut the wires with the cutter to have the copper exposed. With the voltmeter, test the wires. In the case of a Clio 2:

5. Solder the wires
In this tutorial, we will make sure to turn on the LED strip when we turn on the sidelights so the red wire (+) will be soldered to the same green wire, i.e. to the sidelight wire.
To do this, you will have to solder the wires of the LED strip to the corresponding wire.
To have the daytime running light that comes on when the ignition is switched on, you will need to find a nearby (+) wire using your voltmeter that passes current when the ignition is on.
The wires are soldered to the wires of the right rear light, to connect the left turn signal wire, take an electric wire and weld it to the left turn signal wire of the LED strip so as to extend it to reach the left light. You will pass the thread through the trunk seal so that it is not visible.

6. Insulate the wires
Insulate the welds with electrician's tape.
8. Reassemble the rear lights
Now that all your wires are soldered and insulated, you can reassemble the headlight by passing the wire of the LED strip inside the cabin, including the small box at the base of the wires.9. Glue the LED strip on the rear bumper
Remove the strip on the 3M adhesive and glue the LED strip along the rear bumper that you have previously cleaned and degreased, so that it ends up in the space between the trunk and the bumper.
14. Admire the result
If everything has been done correctly, by turning on the position light, the LED strip should light up. By activating the turn signal stalk, they must also light up dynamically. Ditto for the brake light, reversing light and warnings.
Leave a comment
Your email address will not be published.